In the heart of every bustling city—Delhi, Mumbai, Jaipur, Hyderabad—your terrace is one of the few places that can truly offer peace, fresh air, and personal space. But a terrace without design is just a slab of concrete. When planned thoughtfully, it becomes an oasis—a space to relax, entertain, garden, or simply gaze at the stars. At 91homes, we specialize in turning blank terraces into luxurious, multi-functional extensions of your home. This in-depth guide covers every single step in terrace designing—from waterproofing to lighting, from green zones to kids’ play areas.
💧 Step 1: Terrace Waterproofing – The Non-Negotiable Foundation
Before you begin designing, you must start with waterproofing. Even the most beautiful tiles or pergolas will fail if water starts leaking. At 91homes, we recommend using a trusted waterproofing chemical like Dr. Fixit 301 (not sponsored). The process is straightforward but must be followed diligently:
First Coat: Apply the waterproofing chemical directly with a paintbrush across the entire terrace in one direction.
Add Fiber Mesh: Once the first coat dries, apply a fiber mesh evenly over the surface.
Second & Third Coats: Apply two additional coats in alternate directions—one across and one along—to ensure total coverage.
✅ Pro Tip: Once this is done, divide your terrace into zones and fill it with water for 6–7 days. This water retention test helps identify leaks. Only move forward once you’re confident the surface is 100% sealed.
📐 Step 2: Zoning – Plan Your Terrace Like a Pro
Every homeowner has different needs. Some want a peaceful garden, others a party pad. The key is to break your terrace into zones. Here’s what we recommend:
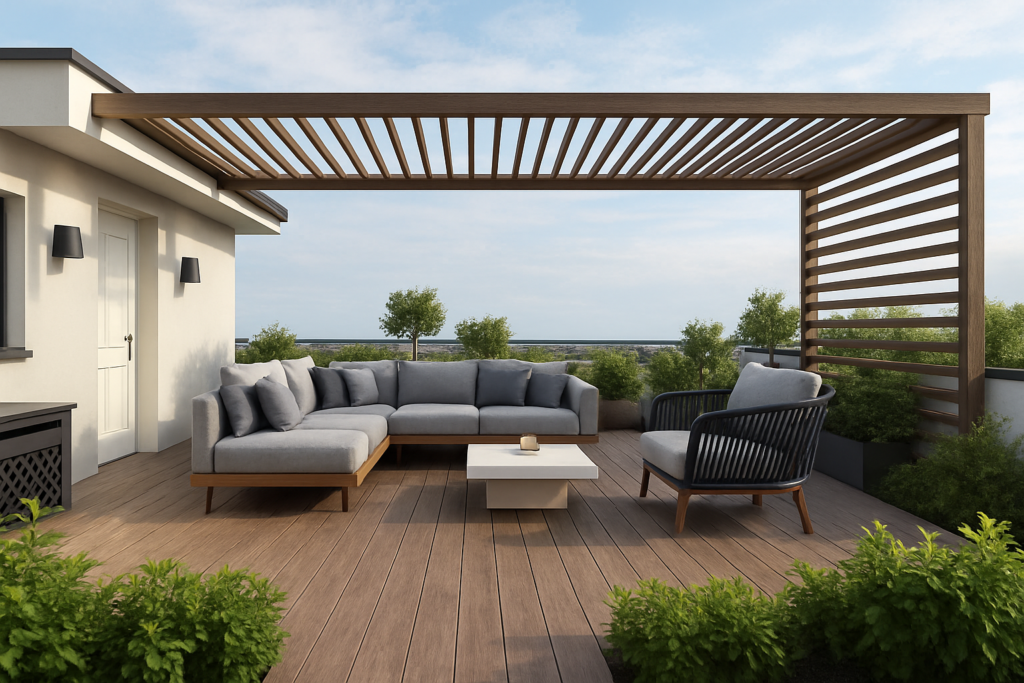
🛋️ Zone 1: The Sitting Area (Pergola)
Placement: Choose a spot with the widest view. Avoid placing it near terrace drains.
Construction: Build a 6-inch raised platform using bricks and khangar fill, topped with PCC. Include electric points for lighting.
Flooring Options:
Wood-textured vitrified tiles for elegance
Porcelain tiles for pattern variety and water resistance
Use granite on boundaries for safety and smoothness
🏗️ Pergola Frame Options:
MS Steel: Durable, affordable, customizable. Recommended.
Wood (IPE or Sheesham): Classy but costly and requires maintenance.
Stainless Steel: Rust-resistant but rarely used due to design limitations.
🛡️ Pergola Roof Options:
Fiber Sheet: Budget option but prone to yellowing
Polycarbonate Sheet: Stronger than glass, stylish, multiple textures
Toughened Glass: Premium feel, expensive
PVC Coated Fabric: Retractable, UV-resistant, modern look
✅ Standard pergola size: 10 ft x 10 ft for 4–8 people. Can go up to 14 ft x 14 ft or down to 8 ft x 8 ft. Never go smaller—it’ll feel cramped.
🌱 Zone 2: Green Zone – Bring Life to Your Rooftop
You have 3 options:
Option A: Pots Only
Decorative planters along boundary walls
Easiest and budget-friendly
Option B: Elevated Planter Boxes
Create 2 ft wide, 2 ft high planters using bricks
Include separate drainage and slope
Add bitumen sheet waterproofing for extra protection
Option C: Real Soil Beds (Premium Garden)
Lay French drains at the base
Apply bitumen waterproofing + geotextile fabric
Add drain cells, another layer of geotextile, and then custom soil mix:
40% cocopeat
30% vermicompost
20% garden soil
10% sand
📏 Soil Depth:
Grass: 4 inches
Small plants: 8 inches
Vegetables: 10–12 inches
Medium trees: 18+ inches
❗ Heavy soil beds must be approved by your structural engineer.
🧸 Zone 3: Kids’ Play Area – Fun Meets Safety
Keep away from terrace edges or stairs
Flooring: WPC (wood-like), gym mats, or soft outdoor tiles
Add Swings or Slides
Bonus: Install a Sandpit with waterproof layering like:
Drainage
Bitumen sheet
Geotextile fabric
Drain cells
Second geotextile layer
Clean sand
🍸 Zone 4: Party Area – Make Entertaining Easy
Locate opposite the pergola to balance foot traffic
Design a bar/serving counter with dual height:
30–35 inches for prepping
42 inches for serving
Include plumbing, electrical, optional gas, and drainage
Finish with quartz for a stylish, durable look
Optional: Roof with polycarbonate sheet
🧺 Zone 5: Utility Zone – The Functional Corner
Ideal for laundry, storage, or light cooking
Build with cement boards if permanent structures are restricted
Add water and drainage points
Tuck into less-visible parts of the terrace
🧱 Flooring Across Terrace – What Works Best?
Vitrified Tiles: Anti-skid, multiple colors/patterns
Kota Stone: Rustic look
Terracotta Tiles: Cool and earthy
Granite: Premium, but retains heat
Sandstone: Unique texture, warm tones
🧠 Expansion Joints: Always leave a 3mm gap between tiles and fill with epoxy to allow for heat expansion and prevent cracks.
🎨 Final Touches: Decor Tips for a Stunning Finish
1. Focal Wall or Corner 🎯
Place in line of sight from entrance
Use HPL panels, vertical gardens, or a fountain
2. Walkways 🚶♂️
Create a central path with Kota/granite
Highlight with grass or pebbles
3. Lighting 💡
Wall lights every 4–6 ft, 18–24 inches above floor
Cove lights under pergola and green beds
Add fairy lights for mood lighting
4. Privacy Screens 🛡️
Bamboo railing (affordable and removable)
MS railing (sturdy)
Trees (for natural green barriers)
5. Parapet Wall Finish 🧽
Paint (low-cost, needs maintenance)
Tiles (maintenance-free, premium look)
🏁 Ready to Design Your Dream Terrace?
Your terrace can be a garden, a cafe, a kids’ zone, and a party hub—all at once. It just needs thoughtful planning and expert execution.
At 91homes, we help you design, visualize, and execute your dream terrace exactly the way you imagine. Whether you’re starting from a blank concrete slab or redesigning an existing one, we’re here to guide you every step of the way.
👉 Book your design consultation now
👉 Explore more ideas at 91homes.in/blog